Thursday, February 2, 2012

My first digital page...

So this month Stampin' UP! is offering a free 30 day trial of their Digital Program. I have been thinking about doing digital. Not sure that I really want to, so this is a good test to see if I want to make that big purchase.
I am a more hands on kinda a girl I think. But this is my first try at making something from their digital program.
I can't tell you how many times I got the error message. It does not like me. And then in the end, it doesn't look exactly how I want it to look. Why can't we color in the stamped image? Why can't you get background paper to fit where you want it to fit without stretching it out of proportion...I have a lot of questions...guess its a good thing that it is a trial version!!
One of the drawbacks... you don't get a whole lot of stuff to work with. This is the only stamp image in there, besides some circles made of dots. So, am going to play around with it some more.
Anyone out there in cyber land have this product? Can answer some questions???


Tuesday, January 3, 2012

New Year's Bundle

I got a creative bug the other day, and I made these little New Year's bundles for my stamping friends!! Here is what it looks like.... but I forgot to add the three little tags that said, Happy New Year on them... but I did make tags for all of them...teeny tiny tags.. :)
The little birdie is a test tube filled with birdseed! I couldn't wait to make it!
Ok, so the weird curly stuff at the top? Well, its a straw. A drinking straw. I cut it with a cutter and made it into a curly thing! Then I used double stick tape, wrapped it around the tube, and then put the ends of the straw on that, then wrapped bakers twine around to cover everything, and tied it in front in a knot...
Hold on to the straw and it bounces...
Here's a closeup of my flower... I like this flower stamp.. and I just got the punch. I know, I'm about 2 years late getting it, but I finally did. I stamped one and cut leaves out of them too...
Here's how I folded the little basket. First I started with a 6 X 6 piece. Fold it triangle wise...
Then you take one of the corners, fold it across like you were going to make a star...
Fold the other side over it, making sure they are even.
Then you are going to unfold them, and reverse fold the sides in, because you don't want to see where they criss cross each other...
Once they are reversed folded, then take one of the ends, and fold it in, and over the folds, making a pocket. It would be cute to fold both ends in too... But I didn't...
So here is what the end bundle looks like. I punched holes in the sides and tied it with baker's twine, but I could have used wire too... or ribbon... or another straw thingy...
Anyways, first project of the year...
Hope you like!


Saturday, December 3, 2011

Candy Bar holder plus gift card...

I got a cute pattern the other day over at Inking Idaho.... I changed it a tad, and these are the gift holders I made.
You insert a candy bar in them, and the bottom portion holds a gift card or card or whatever you want them to hold!
Close up where the candy bar goes...
Then I did a bunch for a swap I'm in. Kinda fun paper, its pink/orange/green and red...
Hope you like!


Monday, November 28, 2011

6 Generation Picture

Last year about this time, my friends mom asked me if I would make her a generation picture, which I did. I did it in black and white, you can find it here. After I made it for her, she asked me if I would make one for her other daughter who passed away a couple of years ago from a blood clot in her lung...
So, I went and got some more pictures, fixed them up, turned them sepia color, I made some frames got some pearls and away I went!
Here is the inside of the picture before it goes in the glass box.
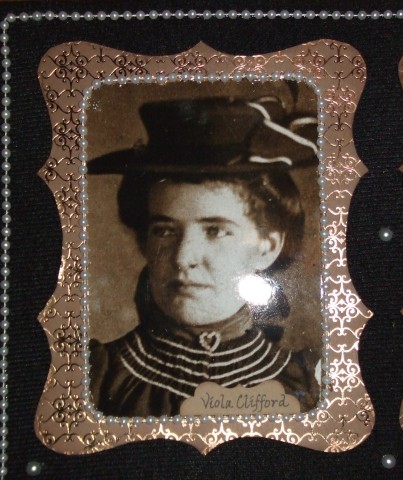
So, for the little boy on the right bottom, this is his great, great, great grandma. I got paper that was brown with copper print on it.
Then, this would be his great, great grandma. The paper for this one was brown embossed in clear.
This is his great grandma, who I made the pictures for. Her frame is made in brown paper with the design embossed in fuzzy material.
This is his grandma who passed away...
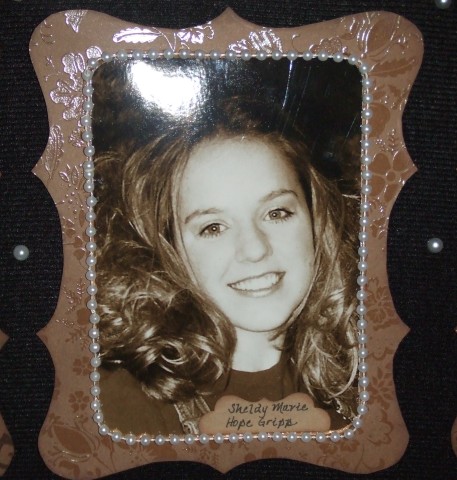
This is his momma...
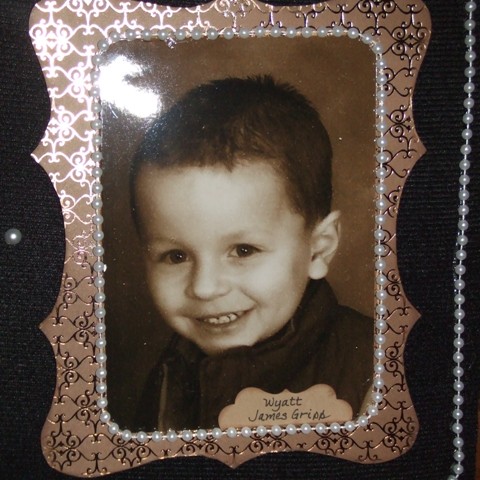
and this is Wyatt.
I put pearls around the base, and around each picture. I dare you find where they end and start!! :) It was a lot of fun to make. Here is the picture in its shadow box...
hope you like!


Saturday, November 12, 2011

Christmas Cards

When I got my crop kit, there was the paper in there to make 4 easel cards. I had gotten another one so I had enough to make 8. But here is 6 of them. They come from a twelve by twelve sheet of paper that has four panels on them. You have probably seen them and if you are like me... I pass them by because I don't know what to do with them.
My friend came up with this design. Cool. Quick and easy. In my kit there was a cutout deer...
And a sheet of letters, that made it through all of the cards!
The sheet with letters also had stickers on it of snowflakes.
*the sled was my own sticker...
This was my favorite, but because the letters were red, we had to put white ink down first.
And that's it. It took about 10 minutes to make them all!
Hope you like!


Wednesday, November 9, 2011

A late Halloween post...

I signed up to go to a scrapbook crop the other day. Unfortunately it got canceled. I was sooo bummed. But, we were going to do some projects at that crop, and she gave us our kits. So, I sat down and started working on them.
This is one of the projects. It is a cute halloween layout. But you know me... I don't follow directions well when it comes to art projects! :) So, here is the layout from the kit....
Using the exact same papers, Here is the layout I made.Close up of the left side...
Of the right side...
The side panel.
And I thought this was fun, I cut out the center part of the design, and now it is a photo mat.
Hope you like!


Thursday, November 3, 2011

Art Class...

Well, here is another reason why I haven't been posting as much. I enrolled into school again. Just taking 6 credits... but they are killing me!! Not really, but it is taking up a lot of my time and I feel a little frazzled and haven't gotten into the swing of things yet.
I am taking one class up on campus. (Sign Language...more on that later...) and then this art class. I have never taken an art class, except for what you had to take in high school. So this is kinda new to me, and kinda hard too! Some of the mediums, I have never used. Some of the things we are doing, I have never done.
So,I thought I would show you some of the things...
(I accidently loaded the pictures backwards...so what I worked on last week is first...)
This is a sphere with shadow in ink. Never done ink before. Not sure that I like it, but it looks kinda cool.
Here's our value charts we made. (I made) For Graphite, Ink and Charcoal.

A cone in ink...
Tube in Charcoal
Sphere in graphite.
The week before, we had to draw a picture from life. I chose a gumball machine. We had to draw it as a construction picture, so you can see the point lines and where the other part might be. Like the gumball is round, not partially round...
This was the week before, we had to draw a picture using plum lines.... I chose this phone because we had phones like this as kids. I was the first one done with mine... then about 15 other phones followed mine. (there were 14 pictures to choose from...) There are about 35 in my class....
So that is some of what I have been doing instead of crafting!!!
My other class is sign language and she has us doing videos all the time... plus labs.. its a lot of work too...
I need to stamp! :)
Hope you like!